Mitsubishi Outlander: Wheel and Tire
Specifications
The wheels and tires of the following specifications have been established.
SPECIFICATIONS
ROAD WHEEL AND TIRE
<EXCEPT FOR CANADA>
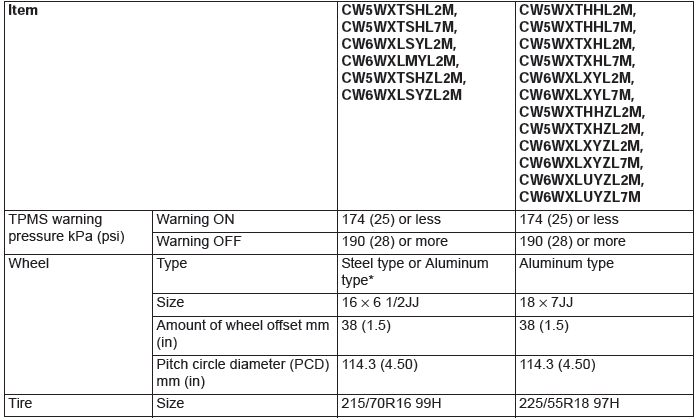
<VEHICLES FOR CANADA>
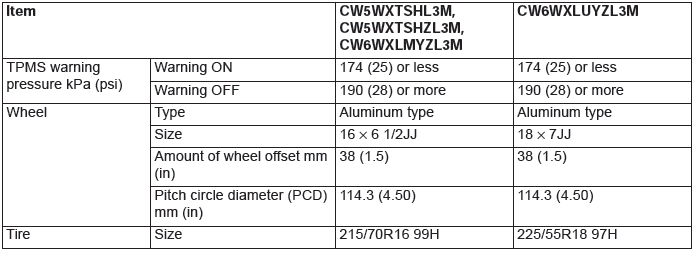
SPARE WHEEL AND TIRE

NOTE: The * mark indicates optional item.
NOTE: PCD (Pitch Circle Diameter) indicates the pitch circle diameter of the
wheel installation holes.
Service Specifications

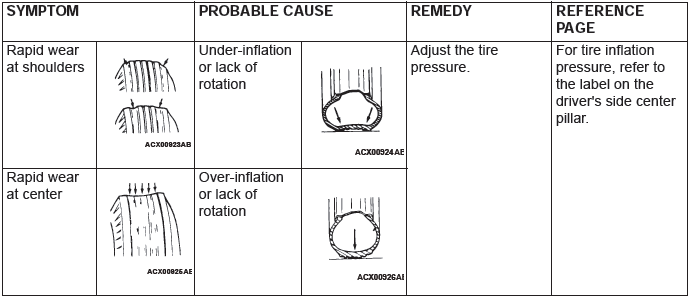
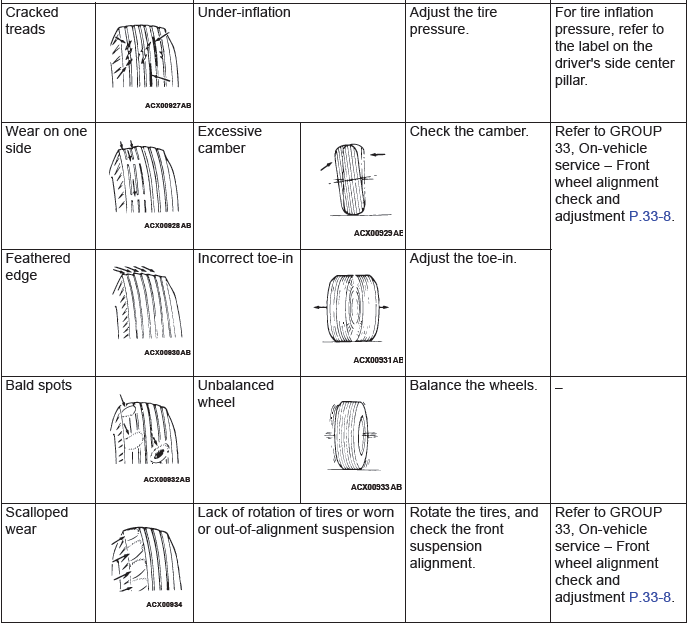
Wheel and Tire Diagnosis
DIAGNOSIS
WHEEL BALANCE ACCURACY
PURPOSE
This section contains tips and procedures for achieving accurate wheel balance. Steering wheel vibration and/or body shake can result if any of these procedures are not carefully observed.
1. Wheels and tires must be properly mounted on a balancer in order to achieve correct balance.
Centering the wheel on the shaft of the balancer is essential for proper mounting.
2. Off-the-car wheel balancers must be calibrated periodically to ensure good balancing results. An inaccurately calibrated balancer could cause unnecessary replacement of tires, shocks, suspension components, or steering components.
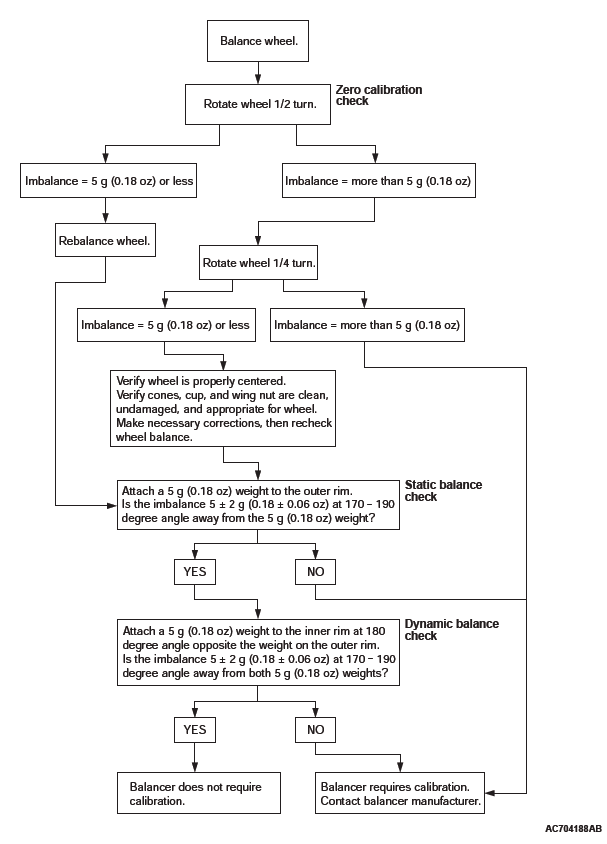
Check your balancer's calibration approximately every 100 balances. Your wheel balancer's instruction manual should include calibration procedures. If the calibration procedures specifically for your balancer are missing, use the generic steps in this section for zero calibration, static balance, and dynamic balance checks. The wheel balancer calibration checks are also described in the flowchart.
PROCEDURE Balancing Tips
1. Confirm that the balancer's cone and the wheel mounting cone are undamaged and free of dirt and rust.
2. On this vehicle, the wheel's center hole on the hub side has a chamfered edge. Use a back-mounting cone on your wheel balancer to center the wheel on the balancer shaft.
3. Install a wheel mounting cone. The appropriate size cone for this vehicle is 67.0 mm (2.64 inches).
4. Before balancing the wheel, remove any wheel weights from both sides. Also check both sides for any damage.
5. When installing wheel weights, hammer them at a straight (not diagonal) angle.
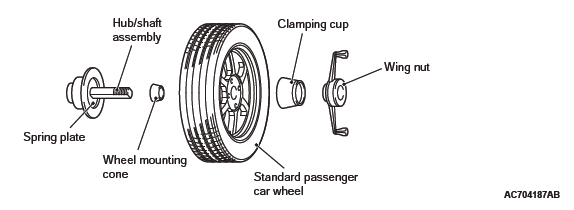
Confirming Proper Balance
1. After balancing the wheel, loosen the wing nut and turn the wheel 180 degrees against the balancer's hub. Then re-tighten the wing nut and check the balance again. Repeat wheel balance if necessary.
2. Turn the wheel again 180 degrees against the balancer's hub. If the wheel becomes out-of-balance each time it is turned against the balancer's hub, the wheel balancer may require calibration.
Wheel Balancer Calibration Checks
1. Mount an undamaged original-equipment alloy rim and tire assembly (wheel) onto your off-the-car wheel balancer. Balance the wheel.
2. Zero Calibration Check
Loosen the balancer wing nut, rotate the wheel a half-turn (180 degrees), and retighten the nut.
Recheck the balance.
- If the imbalance is 5 g (0.18 ounce) or less, the zero calibration is OK. Rebalance the wheel, then go to Step 4 to check static balance.
- If the imbalance is more than 5 g (0.18 ounce), go to Step 3.
3. Loosen the balancer wing nut, rotate the wheel 1/4 turn (90 degrees), and retighten the nut.
Recheck the wheel balance.
- If the imbalance is 5 g (0.18 ounce) or less, the
wheel may not be centered on the balancer, or
the balancing cones, the cup, and/or wing nut are
damaged, dirty, or inappropriate for the wheel.
You may need to refer to the balancer manufacturer's instructions to verify the correct attachments.
After making the necessary corrections, recheck the wheel balance. If OK, then go to Step 4.
- If the imbalance is more than 5 g (0.18 ounce), the balancer requires calibration. Contact the balancer manufacturer for calibration by their repair representative.
4. Static Balance Check
Attach a 5 g (0.18 ounce) weight to the outer rim.
Recheck the balancer. The balancer should detect 5 +- 2 g (0.18 +- 0.06 ounce) of imbalance 170 to 190 degrees away from the 5 g (0.18 ounce) weight.
- If the imbalance is within specification, the static balance calibration is correct. Go to Step 5 to check the dynamic balance.
- If the imbalance is out of specification, the balancer requires calibration. Contact the balancer manufacturer for calibration by their repair representative.
5. Dynamic Balance Check
Attach a 5 g (0.18 ounce) weight to the inner rim at 180 degrees opposite the 5 g (0.18 ounce) weight that was added in Step 4. Recheck the balance. The balancer should detect 5 +- 2 g (0.18 +- 0.06 ounce) of imbalance 170 to 190 degrees away from both the inner and outer 5 g (0.18 ounce) weights.
- If the imbalance is within specification, the dynamic balance calibration is correct. The balancer calibration checks are complete.
- If the imbalance is out of specification, the balancer requires calibration. Contact the balancer manufacturer for calibration by their repair representative.
WHEEL BALANCER CALIBRATION CHECKING FLOW CHART
On-vehicle Service
TIRE INFLATION PRESSURE CHECK
NOTE: For information on tire inflation pressure, refer to the label attached to the center pillar on the driver's side.
NOTE: The TPMS is not a substitute for regular checks of the tire inflation pressure. Be sure to check the tire inflation pressure as usual.
TIRE WEAR CHECK
Measure the tread depth of the tires.
Minimum limit: 1.6 mm (0.06 inch)
If the remaining tread depth is less than the minimum limit, replace the tire.
NOTE: When the tread depth of the tires is reduced to 1.6 mm (0.06 inch) or less, wear indicators will appear.
WHEEL RUNOUT CHECK
Jack up the vehicle so that the wheels are clear of the floor.
While slowly turning the wheel, measure wheel runout with a dial indicator.
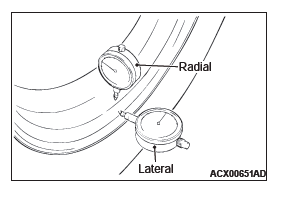
Limit:

If wheel runout exceeds the limit, replace the wheel.
Wheel and Tire
INSTALLATION SERVICE POINT
Tighten the wheel nuts to the specified torque.
Tightening torque: 98 +- 10 N*m (73 +- 7 ft-lb)
Spare Tire Carrier
REMOVAL AND INSTALLATION
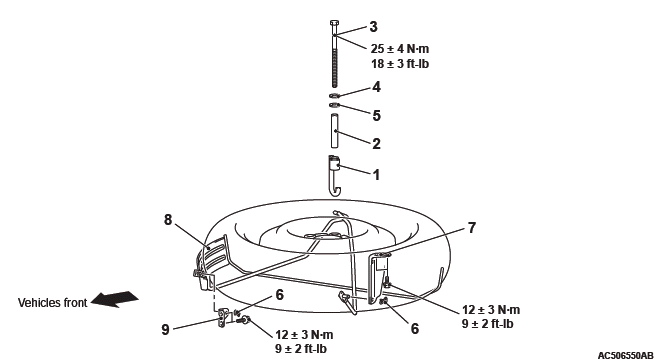
Removal steps
- Spare tire carrier holder
- Spare tire carrier spacer
- Spare tire carrier bolt
- Spare tire carrier washer
- Spare tire carrier washer (made of nylon)
- Spare tire carrier pin
- Spare tire carrier bracket (LH)
- Spare tire carrier
- Spare tire carrier bracket (RH)
Tire Pressure Monitoring System (TPMS)
REMOVAL AND INSTALLATION
Refer to GROUP 42B − Keyless Operation System (KOS) or GROUP 42C − Wireless Control Module (WCM).

